|
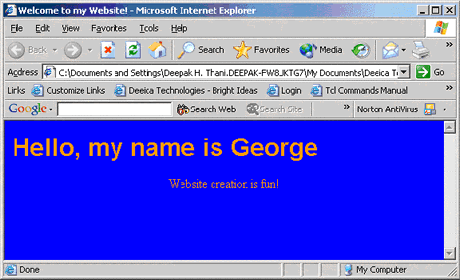
Save the file and open it up in the browser. If all went
well, you should see something like this:
A Note about Attributes: It is important to note that
when defining attributes, you do not put any spaces between
the attribute name, the '=' and the attribute value. Take
for example the bgcolor attribute in the BODY
tag: bgcolor="blue". The reason we
do not put any spaces within an attribute definition is that
the browser uses spaces to determine where one attribute ends
and another begins. Notice how a space separates the bgcolor
attribute definition and the text attribute
definition. Also, all attribute values must be quoted (e.g.
text="orange").
Breaking it Down
You'll notice quite a few differences between the first
page and this new one. The most obvious difference is the
change in color. The background of the page is now blue. This
color was set with the bgcolor attribute in
the BODY tag. As the BODY tag is responsible
for the entire body of the webpage, this blue background is
applied to the entire page.
Secondly, you'll notice the text for the site is now all
orange. This was set by the text attribute,
again applied to all the text on the page because it was defined
in the body tag.
Another easy-to-see effect of adding the attributes to our
tags is the different position of the text "Website
creation is fun!" The paragraph tag, <P>,
has an attribute that specifies how the text should be aligned
for that paragraph. The main possible values are left,
right and center. Try altering the size
of the browser window and youll notice that no matter how
large or how small the window is, that text is always in the
center. You will soon see how handy it is to have this much
control over the position of your text.
The final attribute is the face attribute in
the FONT tag. With this attribute we can change the
style of the text within the FONT tags. Standard font
types can be used (including sans-serif, Garamond etc). An
important point about font faces is that they will only appear
correctly in the browser if the PC has that font installed.
For example, we specified arial as the face for our font,
but if your PC doesnt have the arial font installed (which
it probably does because arial is very standard) you will
see the text appear in the default font (which is Times New
Roman for most systems). Keep this in mind when you are selecting
fonts for your website. Some of the non-standard fonts look
pretty nice, but it isnt helpful if only you can see that
style.
As you might be able to imagine by now, it would be impossible
for me to go through all of the attributes for all of the
tags in this tutorial. Chances are youll never need to use
most of the attributes. What I will therefore do is point
you to a link that has a list of tags and their attributes.
Take a glance through the list to get an idea of what you
can expect your tags to do for you. Do not attempt to learn
this list of attributes and tags, it will not be beneficial.
Instead, use it as a reference when you are creating your
pages.
The complete list of tags and attributes can be found at:
http://www.w3schools.com/tags/default.asp
That is it for Lesson 2. Next up well have a quick lesson
on adding images and links to your webpage.
|